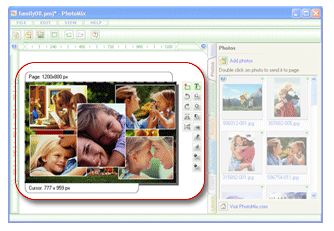
Contents 

Welcome
What's new in PhotoMix?
About this guide
Installation
System requirements
Installing PhotoMix
Upgrading from previous version
Uninstalling PhotoMix
Create your first scrapbook
Step 1: Add photos
Step 2: Choose composition
Step 3: Add photos to project
Step 4: Increase photo size
Step 5: Scroll photo
Step 6: Select frames in project
Step 7: Apply borders
Step 8: Add and edit text
Step 9: Save project as photo
Output options
Save as photo
Set as wallpaper
Send photo via email
Print
Support
Getting support
Contact support
Register PhotoMix
Why register?
How to register
Order PhotoMix
Reference
About fCoder Group, Inc.
Contacting fCoder Group, Inc.
End User License Agreement
Interface
Main Menu
File
Edit
View
Help
Pane
Main
Photos
Composition
Borders
Backgrounds
Clipart
Layers
Smart toolbars
Common frame
Text
Clipart
Several frames
Page toolbar
Sharpen
Blur
Brightenss/Contrast
Gamma Correction
Grayscale
Blue/Red correction
Page
ToolBar
Supported formats
Keyboard shortcuts

PhotoMix Online Help

Prev Page Next Page
PhotoMix

Work area


Work area is where you work with the current project. Here you position frames or apply standard compositions. The work area is white by default but you can select any background color with the help of Color dialog box (on the View menu, select Backgrounds and choose "Set page color" command).

To create a new project, use New project command from the File menu.

To change current page size, use Page setup command from the File menu.

If you see this message, your photo is being processed.

Starting with PhotoMix 5.3, working with markers in the work area has been improved. Now you can specify project margins. Add as many markers as you need to make your layout accurate.


fCoder Group, Inc. © 2005