PhotoMix review by craftyaunt from 3Scrapateers
 |
Photo Mix is a quick and inexpensive why to scrap your memories. Besides the backgrounds, clipart, and compositions that come with the software, you have access to hundreds of free downloads on their website. At $29 it is well worth the cost.
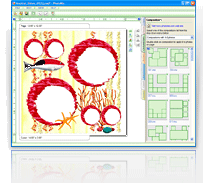
When you start up the program you are presented with a well organized workspace. It isn’t crowded and everything seems to be at your finger tips. A large part of the screen is dedicated to the project that you are creating and the right side has menu options. Photo Mix is made up of several components – Main, Photos, Composition, Borders, Backgrounds, Clipart and Layers.
The Main Tab gives you some shortcut buttons for frequently used functions – Getting Started Tutorial; www.photomix.com website; New project; Open project; Page Setup; Save as photo; Set as wallpaper; Send photo by e-mail and Print.
The Photos Tab is where you add the photos you want to scrap. Just click and find your photos and they appear on the right hand side of the workspace. This is where you can also include any scrap kit elements that you currently have.
The Compositions Tab is a list of layout templates arranged according to how many photos you need to scrap on one page. There are dozens of creative options to choose from.
The Borders Tab is all about frames. The software comes with several choices and there are many available on the website through free downloads. There are 5 masks available with the software and these add the feel of grunge to the outside edging of your photos.
The Backgrounds Tab has all the backgrounds you have to choose from. You can also load some of your own backgrounds in as photos and use them. This tab has a cool feature that allows you to resize the background that you have chosen. You can make the pattern smaller or larger…it goes from .1 to x 10. All you have to do is click and change the size and the background in your project change in real-time. How cool is that.
The Clipart Tab holds all elements that are not backgrounds or borders.
The Layers Tab will show you each layer in your current project.
When you create a layout it is quick and easy.
1. Add your photos to the photos tab
2. Open a new Project
3. Add a composition – layout template
4. Add a background
5. Add the photos
6. Add borders if you like
7. Add clipart (other elements)
8. Add Text
9. Save it
10. Print it
Adding elements to the layout is very simple.
1. Click on the appropriate tab and then double click on the item you want. Once it is on the layout you just need to move it to where you want it. OR
2. Click on the appropriate tab and then click and drag the item you want over to where you want it on the layout.
Editing elements:
Click on the element to make it active and then choose from the buttons that appear when you clicked. You can also choose any of the menu items found in the white area just outside the layout. You have many options to experiment with until you have the result you are searching for.
Size of layout/project:
Photo Mix makes it very easy to resize your layout. You just click on the File Menu and go to page setup and choose a size from the drop down list. If the size you want is not there you can use custom and enter the dimension you want. You can change the page setup at any point in the creative process.
Save/E-mail/Print:
Once your project is finished, it is easy to save, e-mail or print. You click on the file menu and choose what you want to do.
When saving you have many choices:
• Save as a Photo Mix Project – which maintains the layers separate but can only be opened by Photo Mix software ;
• Save as a photo – which includes several formats. The main ones are JPEG, PNG and Photoshop. JPG and PNG will not maintain the layers – but can be opened by any photo software. Photoshop maintains the layers – but can only be opened in Photoshop Software.
If you want to e-mail your layout and click on this menu option, your e-mail software will automatically open and your layout will be attached to the e-mail as a JPG. In my e-mail software it also included a preview in the body of the message.
If you want to print your layout, click on the print option and click print….so easy.
Help Options:
Photo Mix has a built in Help which is broken down into sections according to functions or processes. The website has tutorial and videos to walk you through what you need to know and if you still have questions you can e-mail the company.
Here are some examples of what I have created using Photo Mix

Calendars

CompositionTemplate

Dusky2007

PhotoEffects

PhotoEnhance

QuickPageDownload
Photo Mix is wonderful software that will help you scrap your memories or create your cards. You have the ability to modify and customize your elements, without the expense of huge graphics software. The quick page downloads on the website and the compositions that come with the software enable you to create many layouts in just a short time. I love that I can preview different effects and options and then if I don’t like them I just click the Undo button. Undo is my favorite feature in any software. I would recommend this software to all you scrappers and card makers.
Original Review

